
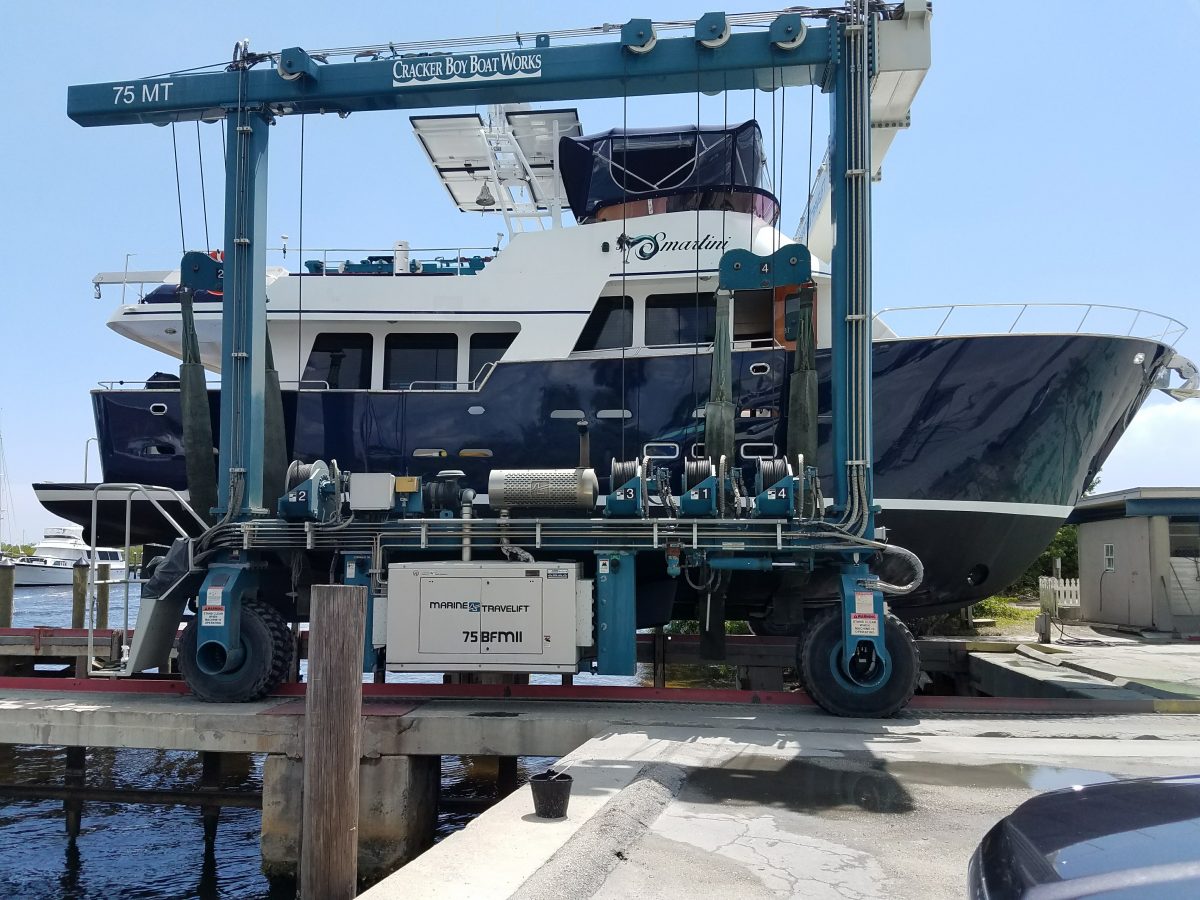
What started as a planned two-week haulout to re-do a poorly done bottom job finally ended last Saturday, after 5 months, 1 week, and 3 days, when we got Smartini in the water again!
 I’ll do a more thorough article on a lot of the things that were done, but here’s a partial list (in case you think we’ve just been goofing off!). Also, we were away from the boat for various reasons (some good, some not so good) for a total of 56 nights during that stretch – almost two months!
Bottom job re-do (sandblast entire hull below the waterline*, apply 5 coats of epoxy “barrier coat” and 3 coats of anti-fouling “bottom paint”.)
Remove rudder; drain oil from it (it’s hollow, so has to have some liquid in it to prevent it from rusting inside); paint it with 4 coats of epoxy; re-mount it with all new hardware, half of which required having parts ground down to fit into the tight confines; re-fill it with propylene glycol (an environmentally friendly anti-corrosive).
Drain keel cooler of 15 gallons of antifreeze; repair small leaks; prime and paint; refill with new antifreeze.
Disassemble “get home” propeller; research and learn that it was assembled totally improperly when the bottom job was last done; clean and reassemble; prime and paint. (This was all Fran – her next trick will be to do this all UNDERWATER.)
Disassemble prop shaft line cutter; clean and reassemble.
Remove all hull zincs for bottom paint; re-install after painting.
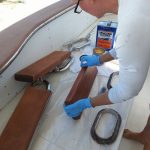
Remove side boarding door for rust repair; repair, fair*, prime and paint*; re-install.
Remove rusted metal around one porthole and around the anchor windlass*; weld in new metal*; apply fairing to repaired areas to make them flat and smooth*; prime and paint those areas.*
Remove the anchor windlass (the hydraulic winch that raises and lowers it) and all associated hardware; remove fresh water spigot from same area (all in preparation for the aforementioned rust repair).
Remove every porthole on the boat (eight of them); inspect for rust (one was bad, the rest were minor); repair minor rust; wait for major repair (welding), fairing, and painting*; clean all the old 5200 (sealant) off the portholes (which took Fran two entire days!); reinstall.
Clean, reorganize, and paint the inside of the “chain locker” – the area below the windlass where the anchor chain is stored when the anchor is not in use. (I easily spent 30 – 40 hours in this space, which I began to call the Pit of Despair. Sweaty and dirty beyond description – and incredibly cramped!)
Remove main engine exhaust elbow insulation; remove exhaust elbow and take it to welder to repair leak; have new insulation made; re-install elbow and test; remove it again to take it back to the welder for him to fix it right this time; re-install.
Remove transmission cooler and take to be cleaned; reinstall it.
Remove main engine temperature sender; replace with new one (after 3 trips to the auto parts store to get the right adapter, then having to drill out and tap the inlet hole another 1/4″).
Reinstall the windlass and all associated hardware; relocate the fresh water spigot.
Minor repair of over 40 small rusty spots all over the boat, mostly on the deck. Most of these involved some fairing, and all needed primer and paint.*
Remove stainless handrail all around the boat to give access to mahogany “cap rail”; remove 15 years of varnish from cap rail with heat guns and scrapers; apply 3 coats of sealer to cap rail (to hell with varnish – that would have required 12 coats!); fill and redrill all screw holes in cap rail for attaching the handrails; reattach handrails. (This project took us the better part of 8 days of both of us working all day. In the future, we should only ever have to reapply the sealer, which at this point is easy.)
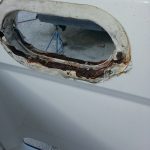
Remove four “hawse holes”, repair minor rust under them, wait for fairing and painting*, reinstall them. (A hawse hole is a hole in the side of a boat though which dock lines are passed, to fasten to a cleat on the inside of the hole. You don’t actually remove the hole, of course – you remove the stainless steel liner.)
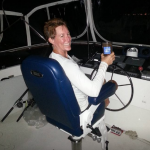
Remove old bench seat at upper helm and install fancy new captain’s chair.
Replace installed fan beside each bed (much harder than it sounds!).
Cleaning, buffing, and waxing of all the blue part of the boat.*
I may come back later and add some more pictures, but so many people have been asking “When will you be back in the water?” for so long, I just can’t wait to post this!
* Asterisk indicates things we paid other people to do, as they were beyond our skill level.
I’m exhausted after just reading this. It must feel wonderful to be floating again.
It does, Sondra. Even though we still have a list of things to do before we can leave our new home – somehow being on a boat, and not a tree house, is way mo’ betta’!
Brian- your post has made me look forward longingly to my own retirement. I had not realized that an option was to fold oneself into an overheated filthy metal box in South Succotash, Florida.
I expect a story in the AARP magazine. “Demi Moore turns 60 and folds herself into a filthy metal box in South Succotash, Florida!”
It’s not as much fun as I made it sound.
I’m just so VERY glad that you two and May the cat are finally back in the water!
Great rendition of the restoration of Smartini! Explain what “fairing” is, please.
Bob,
Fairing is to a boat what Bondo is to a car. It’s the filler material that goes over the rough parts of the hull (on a steel boat, it’s mostly where the steel plates were welded together). You put some on, then sand it smooth. If it’s still not perfect, you put a little more on, and sand it smooth, and repeat until it’s ready for primer and paint. I think the term “fairing” comes from the fact that you do it to make the boat look more fair. On work boats, you don’t do it. You just prime and paint right over the welds, ’cause you don’t care if it’s pretty.