
Faithful readers will know that Smartini recently completed yet another longer-than-anticipated haul out (when the boat is out of the water for various repairs, which either can’t, or can’t easily, be done while IN the water). “Why does it always take you guys so long?”, you might ask. “Shut the hell up!!”, I might reply. But no, that would be rude. So lemme ‘splain. No, there is too much – lemme sum up.
This post is a list of pretty much everything we and three vendors did to Smartini from December 4 to February 22. I didn’t try to make it funny, and it’s long, so unless you’re really interested in what it’s like to own and maintain a boat like Smartini, it probably won’t be all that thrilling.
I should point out that a lot of these things didn’t NEED to be done. In fact, all of the biggest projects were discretionary, and so were a lot of the small ones. We just like to torture ourselves. If you’ve ever done a home remodel project that started with new faucet handles and ended up costing $30,000 for a whole new kitchen, you’ll understand a lot of the psychology that was involved.
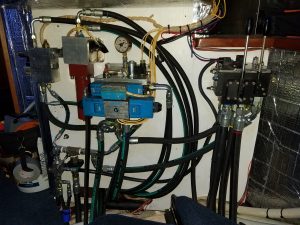
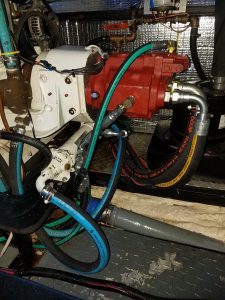
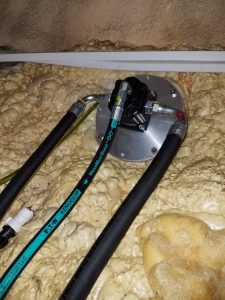
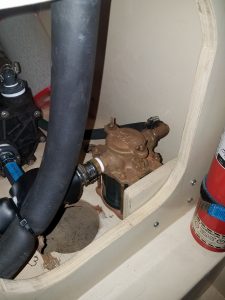
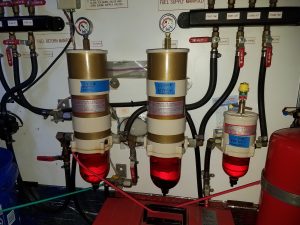
1. Replace all the hydraulic hoses with new ones. We could have waited until a hose burst, but since that would disable every hydraulic item on the boat (anchor windlass, bow thruster, stern thruster, dinghy crane, and stabilizers), and would have made a helluva mess, and would likely have been difficult to have repaired wherever we happened to be when it burst – we decided to do this maintenance item preventively. Almost everything in these two pictures was replaced, relocated, or is brand new. Plus at least 300 feet of hydraulic hoses that run between these points, and from them to all over the boat.
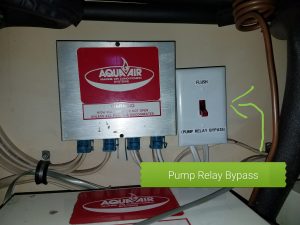
2. Switch the stern thruster from an electric motor to hydraulic power. We could have left it electric forever, although we would have had to change out the two giant batteries that power it – they were rapidly dying. But the hydraulic motor is stronger, and it can be run non-stop for as long as you need it. An electric motor will overheat if run too long, and we didn’t ever want to really need that thruster, and have it overheat and shut down just when we needed it most. Besides – with those two giant batteries gone, we have a LOT more storage space back there – and I’ve used every bit of it. (See item 17).
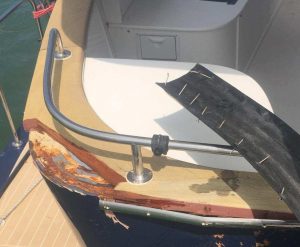
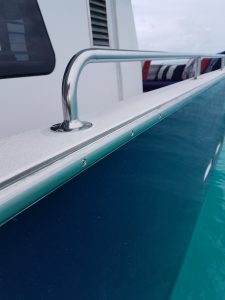
3. Remove the mahogany caprail from all the way around the boat, and then add a stainless steel rubrail to replace the one that was on the mahogany. Hurricane Irma knocked two sections of the caprail loose, and we could have repaired them. However, we knew that there was some rust forming on the metal lip that the caprail is fastened to, and as long-time readers will remember, Rust Never Sleeps on a steel boat. If we didn’t get rid of the wood eventually, we’d have a lot of rust to deal with one day, and we hate rust! So we decided to bite the bullet and get rid of the wood now, rather than some day later. Fortunately for us, the painters volunteered to remove the caprail, thinking it would be a trivial project. Two men, two days, two big hammers and chisels, and one Sawz-All later, they had it off. After they got it off, and primed and painted it, Fran, Kelly*, and I had to remount the stainless steel handrail, which involved drilling 117 holes, and tapping about 20 of them. (*Kelly is the nephew of Romeo, the man who owns the painting company we used. His help with this project was invaluable – thanks, Kelly!!!)
Separately, another vendor fabricated and installed 3/8″ stainless steel flat stock around almost the entire boat (not the transom – we can’t run into anything back there because of the swim platform), and then reattached the heavy stainless rubrail, which had been attached to the wooden caprail, to this new flat stock. It took two men the better part of two weeks to do this, with all the trial fitting, drilling, and tapping, but they did a great job, as you can tell from the picture.
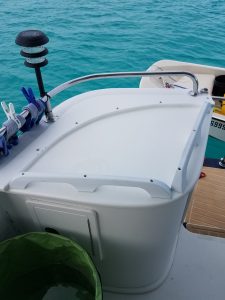
Finally, the wood caprail made up the top edge of the dive equipment storage bench and tackle center that Pratt Plastics custom made for us in 2016. Without the wood, there was a nice, big gap for water to get inside, which would eventually have caused rust. Besides, it was kinda ugly. With Richard Pratt’s help on a Saturday, we now have trim pieces to cover those gaps, and they look like they were made that way from the start. Thanks, Richard!
This was a huge project, considering all the aspects of it, but it was something we knew we’d eventually have to do, and now it’s done. We’re very pleased with the result, and as a bonus, we’ll never have to clean and seal the wood again!
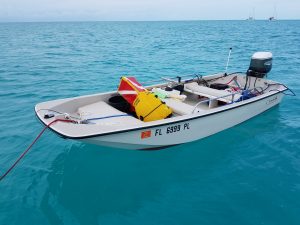
4. We didn’t have to get a different dinghy, but we really didn’t like the last one we had, and visitors DeDeAnn, Heather, and Katie will probably cheer this decision the next time they’re onboard. Of course, a new dinghy meant a new way to store it on the upper deck, so a ridiculously expensive stainless steel cradle was made – which I’m still not happy with (more on that later). But we sure are happy with Killer, our new-to-us 1979 13′ Boston Whaler Sport! (It came with that name, which came with a good story, so we’re going to keep it.)
5. Replace stabilizer fin shaft seals and bearings. Smartini has two big fins that move back and forth under the water to reduce the amount of rolling (side to side movement) we experience, adding greatly to the comfort of a long trip in not-so-calm seas. These fins are hydraulically activated, and I had dealt with the hydraulic actuators last summer when one of them started leaking. But since their shafts go through the hull, there are seals to keep the water out, and bearings to make them move smoothly. We could have waited until we started to see some leakage, but at that point, it would have required a haul out. Doing it now means we don’t have to do it again for at least three, probably four years.
6. We could have limited the painting to only those areas that were scratched during Irma, but we had a bunch of little scratches and rust spots developing all around the bulwarks*, so we decided to have all of that fixed and painted, all the way around the boat. (*Bulwarks are the part of the hull that extends upwards above the deck; the part that keeps you from falling overboard as you walk around on the main deck.)
The above items took 95% of the time of all the work done, and maybe even a higher percentage of the cost of all the work done. But as you can see, every one of them either made Smartini better in some way, or addressed a potential problem before it could become a problem. We kept telling ourselves “When we leave the yard this time, we don’t want there to be a single major project that we know needs to be done. We want to go enjoy Smartini for a long time before we have to do a major haul out again.” I sincerely hope we’ve accomplished that!
The list below is in the order that things were completed, simply because that’s how we were using our To Do List – when something was done, we moved it to the bottom of the “DONE” list. (If it were in order of Frustration Level, or Cost, or Value of End Result, it would be sorted very differently.) Here goes!
7. Replace the transducer. This is the device that sends and receives sonar signals from the boat to the bottom and calculates the depth, so you can see it on your various displays. Since Smartini is made of steel, we can’t use the kind that can transmit and receive through the hull, so ours actually pokes through a hole in the hull. That’s why we HAD to haul out – almost everything else COULD have been done in the water, but many of those things would have been much, much more difficult. The transducer we had to replace was new in December 2016 – and they’re supposed to last forever! Why did this one fail after less than a year? No idea.
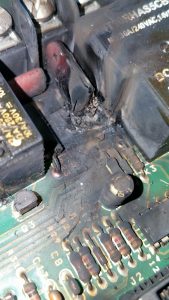
8. Replace the circuit board in the Master Stateroom air conditioning unit. We had the board in the Salon (aka “living room”) unit replaced last summer when it blew. Not long after, the Master unit stopped working, and I suspected its board. I bought a new one (plus a spare – we still have one more unit that hasn’t failed!), and decided to tackle the replacement myself. I wasn’t sure I’d know how to recognize a bad board – but look at the picture!
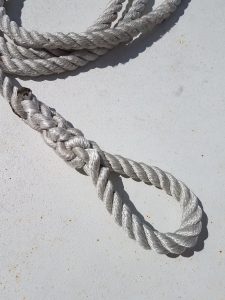
9. Remove the anchor chain, take it to a chain and rope store, and have them add 100 feet of rope. Doesn’t seem like a big deal, but we currently have 175 feet of ⅜” stainless steel chain, all of which had to be lowered to the ground (into the trunk of the car), and then hoisted back up onto the boat after the additional rope had been added – about 20 feet off the ground. It was a workout! And then, because the loop that the rope store had spliced into the bitter end of the rope (that’s the end that fastens to the boat, down inside the chain locker) wouldn’t fit through the hole into the chain locker, we had to cut off his very nice splice, and watch about a dozen YouTube videos to find one that showed us how to do it ourselves. This picture is of the SECOND one we did (just for practice). The FIRST one (on the anchor rope) wasn’t nearly as pretty! Guess we should have done the practice one first.
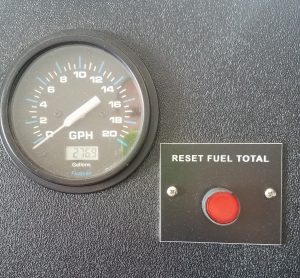
10. Install a “Total fuel used” reset button on our fuel flow meter. For some reason, such a button had never been installed, so if you wanted to reset the total (like when you fill the fuel tanks), you had to actually cut off the main batteries to the whole boat for a few seconds. I installed this little red button that lets us reset it to zero whenever we want.
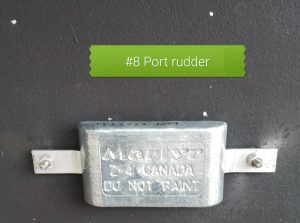
11. Whenever you have different metals in an electrolyte (salt water is an electrolyte), you create a battery of sorts. So a steel hull, a bronze propeller, a stainless steel propeller shaft, bronze through-hull fittings – all of these things are part of Smartini’s submerged parts, and collectively, they create a very large (although very low voltage) battery. Over time, as electrons flow through the electrolyte from one metal to another, they corrode the “least noble” (think “softest”) metal. You don’t want any of the parts of the boat to corrode, so you add one more part to the mix – some zinc. Zinc is less noble (softer) than all the other parts of the boat, so the zinc is the metal that corrodes. Every so often, you replace the hunks of zinc, so the new ones will corrode, rather than any other part of the boat. Smartini has eight such zincs on her hull, each one weighing about five pounds when new. I removed all of them, cleaned the stainless steel studs that they attach to, and reattached them with new washers and nuts. (They don’t work unless the attach points are clean.) Except one, which was pretty corroded – I replaced that one with a new one.
12. Drill out the mounting tabs for all the new hull zincs we bought. They come with no holes, because every boat’s mounting studs are a different distance apart. Now we have a full set of zincs, drilled and ready to mount, for when the existing ones corrode too much. We can easily do this in the water with scuba gear and a single wrench, whenever needed.
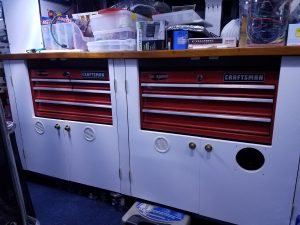
13. Smartini has two three-drawer tool chests mounted under the workbench in the engine room, which is awesome. Under them are the eight “house” batteries (the batteries that run all the lights, the refrigerator/freezers, the pumps, and most of the rest of the electric things on the boat). To keep tools from falling onto the batteries (resulting in a massive shower of sparks and probably a ruined tool, maybe a ruined battery, maybe even an explosion!), the tool chests and batteries are behind some cabinet doors. Which means that every time I needed to get into one of the tool chests, I had to open two cabinet doors, which then kept me from moving fore and aft in the engine room. Doesn’t seem like a big problem, but I tell you, I was constantly cussing this design. Not anymore! I removed the doors, took them to a cabinet shop and had them cut them down to my specs, and then I reinstalled them. I had to relocate the latches, too. But it was sure worth it! Now I can get into my tool chests without opening a cabinet, and my batteries are still protected. The drawers lock in the closed position when underway.
14. We have a really bright handheld spotlight that’s very nice as a backup to our permanently mounted spotlight. (Which I had to repair when we were in Key West.) On our oh-so-bumpy voyage from Key West at the end of November, the handheld light fell from its perch at the flybridge helm station onto the floor with a great THUD, and stopped working. Fortunately, it was only the lightbulb, which is a common automotive halogen headlight bulb. Unfortunately, you have to completely disassemble the whole spotlight to replace the bulb. Which I did.
15. Update the firmware on all of our electronics.
16. Update the charts on our electronic chartplotters. In this case, we actually switched from one provider (C-MAP) to another (Navionics), so Fran had some fun with that! (Not.)
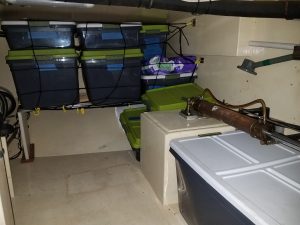
17. Remove two giant batteries and all the wiring and other wiring and other gizmos for the now-removed electric stern thruster motor from the lazarette, then create a storage area for spares. (You can’t believe how many spare parts we have onboard – and they all have to go somewhere!)
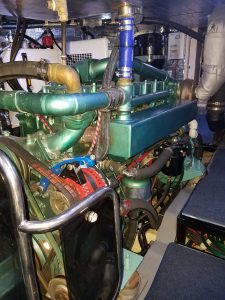
18. Replace all main engine coolant hoses. Smartini’s engine, an 838 cubic inch Izuzu Industrial diesel, has fouteen hoses for keeping things cool. Half of them move anti-freeze throughout the engine and between the engine and the keel cooler (our “radiator”, which is on the outside of hull), and the other half move seawater through various heat exchangers (to cool the transmission fluid and the hydraulic fluid), then inject it into the engine’s exhaust, to cool the exhaust and to get rid of the seawater. All in all, it’s about thirty-five feet of hose, involving almost thirty hose clamps, and lots of “chafe guard” to keep holes from getting rubbed into the hoses. It hadn’t been done since the boat was built, so it was way past time. And yes, I did this one all by my lonesome.
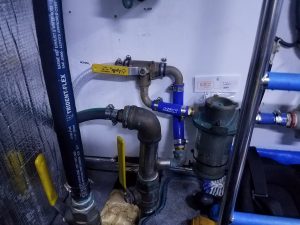
19. Modify the air conditioners’ seawater cooling system to allow it to be flushed periodically, to clean it out. This was a lot trickier than I thought it was going to be, mainly because I had very little room to add the 2-way selector valve I needed. (See picture.) Also, I had to add a manual switch to engage the seawater pump, so that I can do the flushing without having to fire up one of the air conditioners. (The pump comes on when any one of the A/C units comes on, but there wasn’t a way to run only the pump, for my flushing circuit.) Now, I can run a mild muriatic acid solution through our air conditioners’ cooling lines to get rid of the crud that inevitably builds up inside of them, and don’t have to run the A/C units to do it. I’m actually pretty pleased with myself on this project!
20. Replace all the low pressure hoses that supply water to the watermaker. This also involved relocating the sea strainer (a filter that keeps out big stuff – there’s one in every seawater intake: main engine, generator, air conditioners, water maker), and that was the challenge. It had originally been mounted in a very weird spot that was practically impossible to get to for inspection and cleaning. I cut out a big section of wood to make an opening into a hard-to-reach spot, and remounted the strainer where I can now easily inspect and clean it.
21. Create a cradle for our new dinghy, Killer. This was, I believe, the most annoying thing done during the haul out, because the vendor took it upon himself to modify the design from what we had originally agreed on. When I first saw it, still in “rough” condition, I should have yelled “Stop! That’s not what you were supposed to make!” – but I didn’t. I let myself be talked into this new design – and each subsequent modification that was necessary because of the deficiencies of the new design. Well, it’s not what I wanted, but it sure was expensive! However, it works, and that’s what matters, I guess. It just won’t ever be what it was supposed to be. Grrrr….

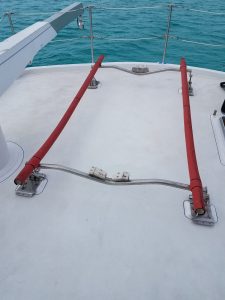
22. Add four new tie-downs to the upper deck to make sure we never again have a loose dinghy while underway. Each one involved drilling and tapping three holes in the deck.
23. Remove the hatch lid from the aft deck to the upper deck, take it to have the Plexiglass replaced, and remount it.
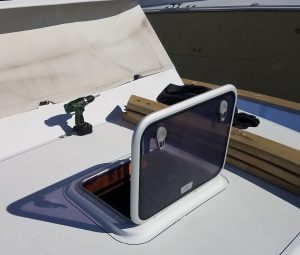
24. Remove the hatch on the foredeck that opens into the VIP Cabin and flip it 180 degrees. Because for some strange reason, it was mounted backwards when the boat was built. In other words, when you opened it, the opening faced aft – so almost no air came in through it when at anchor. Future guests – you’re welcome!
25. Replace all three main engine fuel filters, and both generator fuel filters. Add a vacuum gauge to each of the primary filter housings to indicate when it’s time to change the filter cartridge.
26. Paint the bottom of the new dinghy with two coats of primer and one coat of bottom paint.
27. Speaking of bottom paint: apply two more coats of bottom paint to Smartini. Yes, after applying five coats of primer and three coats of bottom paint at the last haul out, we had to put more bottom paint on this time! It turns out that the bottom paint we chose, once it goes in the water, can’t be OUT of the water for more than 72 hours before it needs to be scuffed and re-coated. We were obviously out a lot longer than 72 hours, so we paid our painters to scuff the entire hull, then Fran and I put the bottom paint on. And since we tend to overdo things, we did two coats.
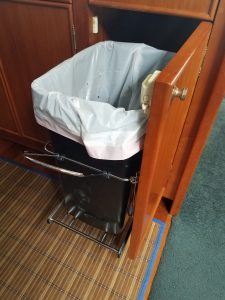
28. Install a pull-out trash can in the galley. Seems like a small thing, but it’s so much nicer than having to drag the trash can out of the cupboard and stuff it back in every time.
29. Disassemble, service, and reassemble the crane that lifts the dinghy on and off the upper deck. This was not a job for amateurs – we farmed it out. And after watching them do it, I’m sure glad we did! Definitely above my pay grade.
30. There’s a stainless steel safety rail running all around the back half of the upper deck. Some of it is fixed, but the aft-most portions are removable so that the dinghy can go on and off. For some reason, they made the section where the crane goes when hoisting or lowering the dinghy a fixed section. Sure enough, the very first time we put the dinghy in the water after we bought Smartini, we lowered the boom of the crane too low, and bent that section of the railing. So we had that section converted from fixed to removable. (That involved cutting and welding stainless, so we didn’t do that job.) Now we can lower the boom as low as it goes and not hurt anything.
31. Another bit of Irma damage was to one of our downspouts that drains water from the upper deck. (We added these at the last haul out.) It rubbed (and rubbed, and rubbed, and rubbed!) against the dock piling in Key West, and while it mostly chewed up the piling, it also got pretty bent out of shape in the process. So we had it cut out, and a new one welded in. And because we weren’t thrilled with the ones that were put in originally (not long enough, not enough downward slope), we had the other side done, too.
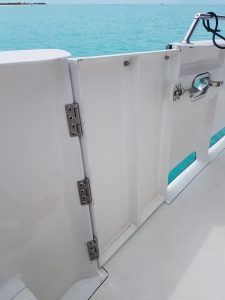
32. One of our three side boarding gates banged against a piling during Irma, and bent the heck out of the hinges. So we bought some new, heavier duty hinges, had them drilled to match the old ones (the new ones came with no holes), and re-hung the gate. If you look closely at the picture, you’ll see that we couldn’t get all of the bolts started in the bottom hinge – a project for another day.
33. Another of our boarding gates has always rubbed the deck in one bottom corner, and it takes the paint off, then it rusts. We couldn’t mount the gate any higher, so we decided to have ¾” cut off the bottom. We removed the gate, had someone cut the bottom off and weld a new bottom on, then the painters faired and painted, and we re-installed.
Wow! I’m exhausted just writing about all of that work! Vendors did a lot of it, but still – whew! However, this wasn’t all we had to accomplish during our almost-three months in the yard. In addition, we also had to:
Get the car to the body shop to fix the scratch that they didn’t fix the first time.
Sell the old dinghy.
Register the new dinghy.
Get rid of the trailer that came with the new dinghy.
Buy about 100 things that we’d need for spares, or for future projects, or whatever. Maybe it was 200 things.
Provision for the Bahamas. Fran spent about two days on this alone.
Investigate, choose, then switch us to a service that can handle all of our physical mail, no matter where we are in the world. It’s called St. Brendan’s Isle – a weird name for a very cool service!
Investigate, choose, purchase and set up a satellite phone. Then deal with the police report, and buy another one, when that one was stolen from our galley!
Sell our old underwater camera setup.
Investigate, choose, and purchase a new underwater camera setup.

Somewhere in the middle, we flew to Indianapolis, then drove to Brooklyn, NY to deliver Bennett to Pratt Institute, his new venue of higher education.
Can we please, pretty please, pretty please with sugar on top, not have to haul Smartini out of the water for at least two years? Please??????
Here’s hoping you have many days of relaxation and low maintenance and thank you in advance for #24!
You’re welcome, Jeff! Although in October, you may not need it quite as much as our summer guests.
That settles it. Based on what you’ve described, I’m buying a boat. The whole thing seems effortless!
Isn’t there a saying about owning a boat vs having friends that own one?
Yes, there is such a saying. Aren’t you lucky to have a friend who owns a boat, so you don’t have to?
Few things: 1) Absolutely LOVE the post. I know some think this is boring boat crap, where is the pretty water and gorgeous lifestyle, but for those of us planning and considering this life, this is exactly the kind of post we love. 2) I would love to see/hear about your plans (I know you don’t have to have them but do you plan to stay for a week, a month, a day in what locations, where you headed, timeline, and what is on your “bucket list of have to see” on your adventure. 3) I would love to see your list of provisions: food, gear, spare parts, and other info like who is your sat phone/internet/tv provider, are you happy with them, how hard is it to buy provisions along the way, is it really 2 and 3 times the cost for “everything, everywhere” in the Bahamas?
We know the great parts: adventure, peaceful (hopefully for you now that this is over?), beautiful water, snorkeling, diving, fishing, meeting great and new people, sharing experiences, etc.
Best wishes to you both, keep up the great info and PLEASE PLEASE PLEASE I hope there isn’t another haul out for you as well, and you get to enjoy the life we all want!!!!!
Mike, glad you like this kind of post. I kinda like writing them, but I’m not really sure why! As for other details that you asked about, several of those would make good posts by themselves – we’ll put them all in our Potential Posts list! But I’ll give you a quickie answer to one of them now: our only real plan at this point is to explore every bit of the Bahamas that seems worth exploring (except the Abacos, as we’ve been there three times already). As for length of stay in each place, we really do make it up as we go, with the only real limitations being arriving and departing guests, punctuated with maintenance issues.
For example, we were in and around Nassau for most of March because we had two sets of visitors flying into and out of Nassau. When the second set left, we were going to begin our thorough exploration of the Exumas, but our watermaker went on the fritz. We had to order parts, and the service will take place in Nassau, but the work won’t be done until April 9. So we decided to explore just the northern Exumas until April 8, which is what we’re doing now. We came to Norman’s Cay first, to meet some friends who were going to be here for a day. They left yesterday morning, but it was overcast all day, so instead of relocating to a different island, we just stayed here and did projects. Today is beautiful, so we’re going north to Highborne Cay for a day, or two, or three. That’s how it goes!
Holy moly! Dat’s a lotta WORK!
Who and where’s your plastics master, perzackly?
Heading off to Aruba and back next week or so, then heading back out!
regards
bill and ellen domb
Bill,
Richard Pratt, Pratt Plastics, Titusville, FL.
When you “head back out,” you coming to the Bahamas?