
Warning: this post won’t be interesting to very many of you, as it’s very “nuts and bolts”, and not about interesting people, beautiful places, or awesome food. Read on if you like, but don’t feel bad if you lose interest after a paragraph or two and stop. I didn’t enjoy writing it – you don’t have to enjoy reading it!
M/V Smartini is a steel boat – from the bottom of the keel all the way up to and including the upper deck, she’s made of steel. The vast majority of pleasure boats are made of fiberglass – it’s way easier to make a boat out of fiberglass, because you make a mold and just keep making the same parts over and over again. Neither process is better, although a steel boat is stronger than a fiberglass boat – if one of each type were to smash together, there’s no question which one would suffer the greater damage.
But no one plans on smashing their boat into another – or into anything, for that matter, and when we were looking at boats to buy, we were no different. So we didn’t set out to buy a steel boat. We just happened to fall in love with a boat made of steel, and we bought it. So we have a steel boat.
If steel is allowed to be in contact with water – especially salt water – for any length of time, it will rust. That’s a fact. “But a boat’s in contact with water ALL THE TIME!”, you may say. Yes, it is, but several years ago, they began using epoxy paint on the hulls of boats so that the water never actually touches the hull. This was a huge step forward in making steel boats last a long, long time. But the inside of the hull, especially below the waterline, is very susceptible to condensation, because of the almost constant difference between the temperature of the hull (since it’s in water) and the temperature of the air inside the boat. Think of a glass of iced tea outside on a hot, humid day – that’s what happens on the inside of steel boats. That’s why it’s often said that steel boats rust from the inside out – it used to be very true.

But boat builders figured out if you spray the entire inside of your steel hull with a thick layer of “closed cell” foam (it doesn’t absorb water), you can keep the inside of the hull just as protected as the outside. Smartini has at least 3 inches of foam on every square inch of the inside of her hull, as well as 3 coats of epoxy on the outside of the hull – so we should never have to worry about the hull rusting below the waterline – yay! She won’t sink!
Now, you don’t think I’d write a whole blog post just to assure you our boat’s not going to sink, do you? Of course not. I’m writing about the rust that can, and does, occur all over the rest of the boat – the main deck, the upper deck, the sides – pretty much all of the boat you can see. Because all of those parts are steel, and are frequently wet. Not a problem, as long as they don’t STAY wet. Smartini doesn’t have very many areas that stay wet for very long, and most of those have a really good coat of paint, so rust isn’t a problem in most places. MOST places, I say…
The first time we looked at the boat as serious potential buyers, the broker, being the responsible broker he is (thanks, John!), pointed out every flaw he knew of on the boat. That included the fact that there was a little water in the aft bilge area, and it had sat there long enough that it had caused the paint to loosen, and some rust to form. This was a very small area – about the size of my hand – and I could tell the rust wasn’t bad, so I wasn’t worried about it. I knew I could repair it, and I didn’t even have to rush to do that. The bigger question was, where was the water coming from? If I could figure that out, I could stop it, and totally solve the problem.
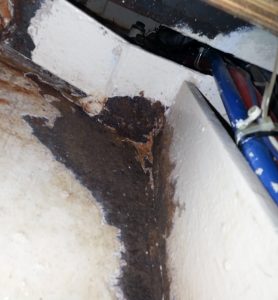
Well, I’m pleased to say that, in about 15 minutes of sleuthing, I discovered precisely how the water was getting into the boat. John said he noticed the water in the bilge after it was washed, or after a heavy rain – it was dripping through a hole that had been cut in the aft deck to allow hot and cold water lines, and some wiring, to be run up to the aft deck for a shower and an electric outlet.
The hole had apparently not been properly sealed, or if it had, it had failed at some point. I couldn’t see into the area very well, as it was enclosed by a wooden “shroud” into which the shower was mounted, but I could see well enough to confirm that was the source of the water in the bilge. Specifically, the water was getting into that area, behind the shroud, through a pair of drain holes that had been cut into the base of the shroud on each side. I was confident that all I needed to do was properly seal around that hole, and I’d solve that problem. If only I had been more concerned about it, I’d have done it sooner. If only…
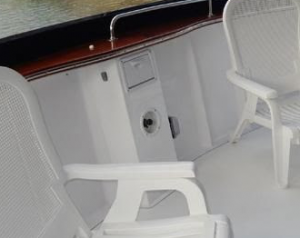
This was in December 2015. We bought the boat in January 2016, and all through the summer and fall, we did all kinds of work on the boat – fixes, additions, modifications – but I was never too concerned about the rust area. Finally, in mid-November, less than a week before we were to move the boat to Titusville to have a bench seat / dive gear storage bin built onto the aft deck, I decided I really wanted that shroud removed, so the bench could be longer, and the shower and electric outlet could be mounted in the side of the bench, instead of the shroud. Also, I didn’t like the fact that it was so hard to get to the back side of the shower to inspect it and work on it if necessary. It was the perfect opportunity- I’d remove the shroud permanently, re-seal the hole, and construction of the bench could begin.
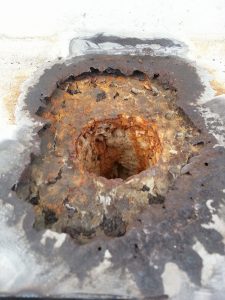
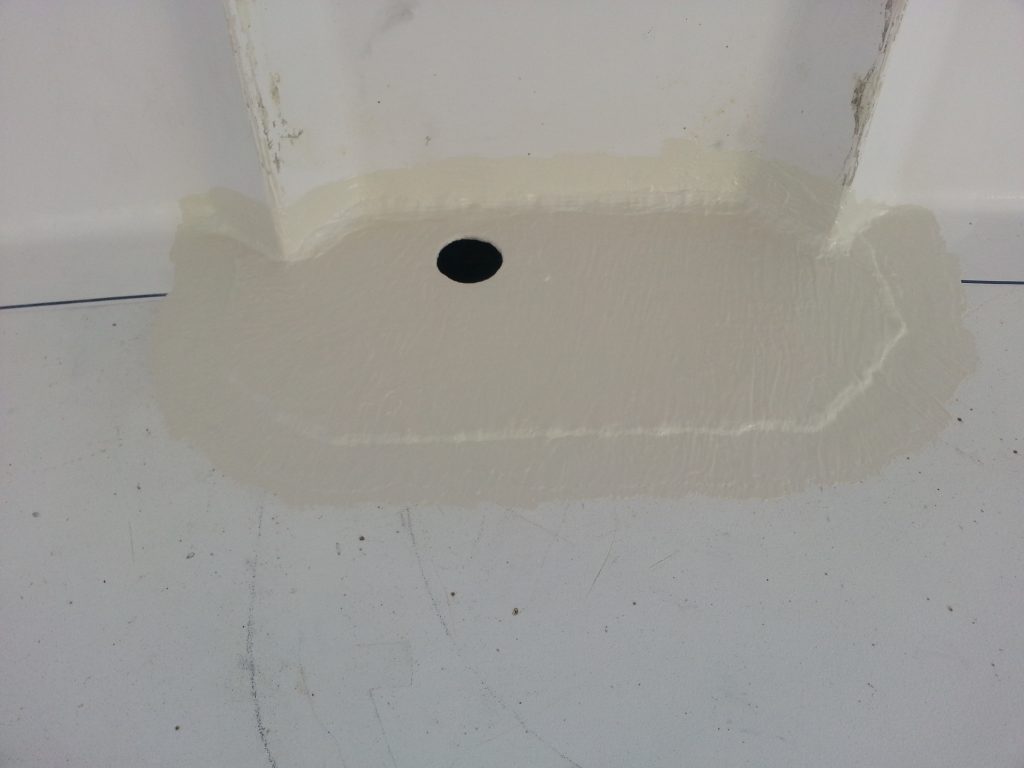
Out came a few hand tools, and in less than an hour, the shroud was gone, to reveal, finally – this:
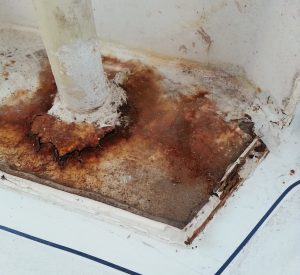
Ugh! I sure wasn’t expecting to find that peeling paint and the obvious rust, but how bad could it be? Turns out, pretty bad. The more rust I removed, the worse it got. In the end, there were three areas where the deck had been completely rusted through, exposing the foam on its underside. All around the hole where the water lines and wiring came through, and a spot on both sides of it, just inside the drain holes in the shroud. Ironically, I think the holes never did let any water out of the enclosed area – but they sure let a lot of water in!
The entire rusted area was about 22” x 12” – pretty big. But I figured I’d just get a welder to weld a patch plate over each of the holes, I’d put some epoxy paint on it to keep it from rusting anymore, and the new bench seat would cover it all up, and keep water from ever getting to that area again. No need to panic.
 But what about that foam? It’s FLAMMABLE! And welding is hot – really hot. So hot there’s no way to weld that area and not set the foam on fire. Fire on a boat is a bad, bad thing. No welder was going to touch this job with a ten foot welding rod unless I got all of that foam away from the area.
I couldn’t get much of the foam out through the rust holes – they seemed huge, but I could barely get a hand through even the largest one – and I had very poor access to the underside of the foam. To make matters worse, the foam in this area wasn’t 3” thick – it was as much as 8”, maybe even 10”, in some places! If I was going to rid the area of foam, I was going to have to have some bigger holes to work through. Yes – I was going to have to CUT HOLES IN OUR BOAT! But I didn’t have anything that would cut through steel. I do now, though!
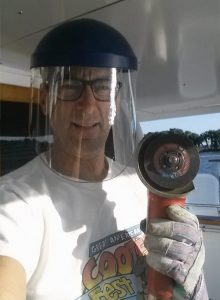
Gingerly, and with a bucket of water and a soaking towel close at hand, I started cutting away at the steel around the rust holes. The shower of sparks thrown off by cutting through steel with a grinder would absolutely catch the foam on fire if I wasn’t careful! So I was careful. Very, very careful.
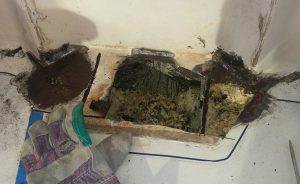
After several hours, I finally had the holes big enough to start tackling the foam removal. First from above, then from below. Then above again. Then below again. With a hacksaw blade, and a couple of different screwdrivers, and a pry bar, and anything else that seemed like it would help chip away at the foam, I attacked it. I removed more than two 5 gallon bucket loads of foam, and in the end, I had a foam-free zone at least 4” away from the area where the welding would have to occur, 6” in most places.
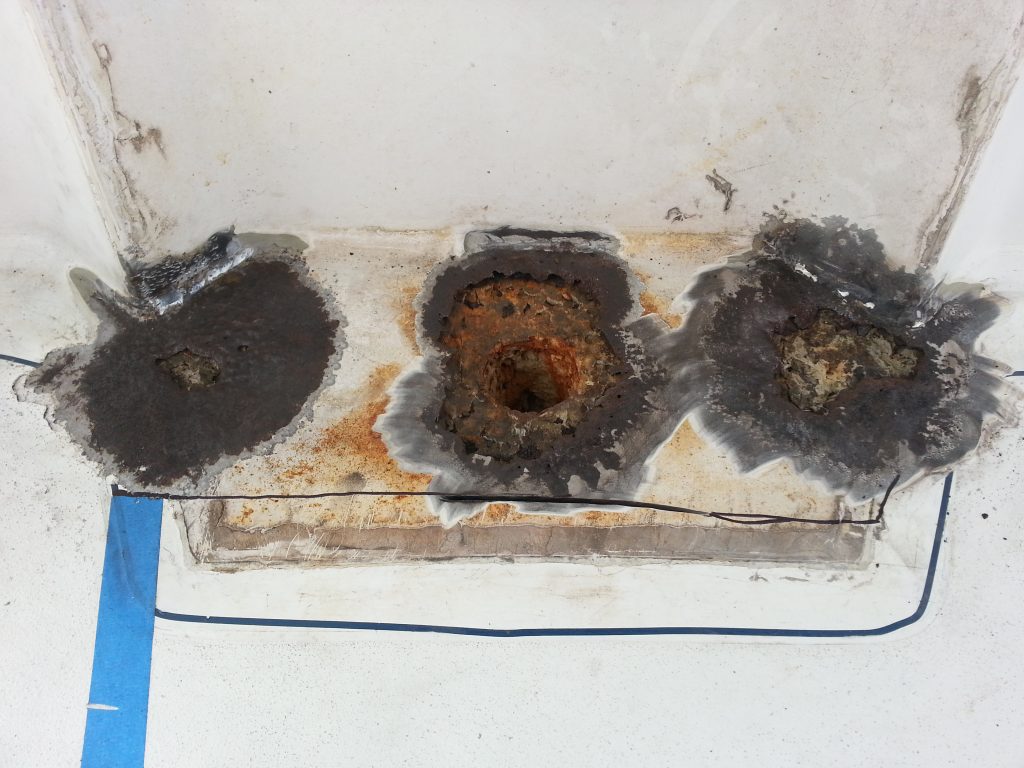
Just about the time the welders arrived, I was finished. They determined that one big plate, welded over the entire affected area, would be better than a smaller plate over each hole. They made a cardboard template of the area, cut a steel plate to match, and were ready to get started. They had an electric welder (Mig? Tig? The Stig? Something like that) that concentrates the heat in a very small area. But I wasn’t going to take any chances with all that foam under there, even though it wasn’t close to where they’d be welding.
I got a bucket of water and a kitchen towel, and went down to the underside of the deck where they’d be welding. By lying on my back on top of one of our giant stern thruster batteries, and across the steering arm, in a position I would describe as somewhere between torture and the yoga pose depicted here, I could apply the soaking wet towel to the underside of the area they were welding.

They’d yell “Go!”, and I’d apply the towel to the glowing red spot, preventing any sparks from coming through to the underside. They’d weld for about 30 seconds at a time– about an inch-and-a-half. By then, my wet towel was getting pretty hot, and the area I was working in was getting a little smoky. They’d stop for a minute or so, I’d re-soak my towel, blow the smoke out of my area, and we’d do it all again. After about 30 minutes, we were done!
The hard – and scary – parts were finished. We no longer had three holes in the deck! But I did need one hole, for the wires and water lines to come through. Off to Ace Hardware for a 2” hole saw. Back to the boat to cut the hole, only to find out the saw required a 1/2” drill, and mine is only 3/8”. Back to Ace Hardware to buy a 1/2” drill. Back to the boat to cut the hole. Never having used a hole saw on metal before, I didn’t do it right, and I actually bent the hole saw. Back to Ace Hardware to return it for another one. Back to the boat to cut the hole. This time – success!
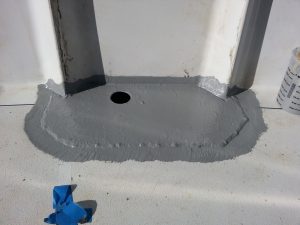
Now, I just needed to seal the bare metal with a sealer, and paint it with the protective coat. Since this would be totally hidden by the new bench, I didn’t need to worry about a pretty topcoat of paint. Both the sealer and the protective coat are two-part epoxies – you mix the two parts, and a chemical reaction begins that starts to cure the mixture into a hard surface. Once you mix it, you have only a certain amount of time before you can’t apply it anymore – the warmer it is, the shorter that “working time” is. The sealer needed only one coat, so I mixed it, applied it, and tossed the remainder. It had to cure overnight, so off we went to Kasey Powers’ wedding in Orlando.
I haven’t yet mentioned how stressful this whole project was, for many reasons. Cutting holes in our boat, the risk of fire from the welding, never having worked with these epoxies before and knowing I had only one chance to get them right, and the time crunch. We missed Kasey’s rehearsal dinner the night before because I had to get the area ready for the welders, and we just barely made the actual wedding. But the main time crunch was this: we were booked on a flight to Indianapolis for Thanksgiving on Monday morning. If I wasn’t finished by then, the bench seat project was going to have to be delayed by another whole week. The project we specifically came to Titusville to get done. The project that was keeping us from finally heading south. The project that had begun in JUNE! I was not OK with another week’s delay, so I was stressed like a long tailed cat in a room full of rocking chairs.
Sunday morning, it was time to mix up the epoxy protective coat and apply it. It was going to need two coats, but the time you have to wait between coats is about the same as the time before it starts to be too hard in your cup to apply. But the chart showed that the working time is quite a bit longer if the temperature is cooler – so I just put it in the refrigerator! Brilliant, right? It certainly worked – 6 hours later, when my first coat was dry enough for another coat, the paint in the fridge was still liquid enough to brush on. It was only the next morning that Fran started to notice that everything in the fridge had a nasty chemical smell and taste. The butter, the cheese, it even seeped through the plastic wrappers for the bread and hot dog buns! Thankfully, it did not affect the beer – that would have been tragic.
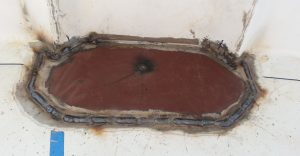
 Look, Ma – no rust!
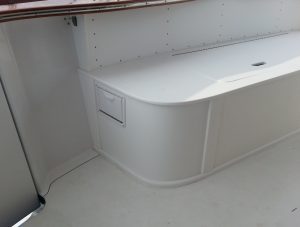
By Sunday evening, I was finally cleaning everything up from this whole / hole ordeal. We got on the flight to Indy the next morning, and all the stress was gone. Over the ensuing couple of weeks, the built-in bench was built in, and now, no one will ever know about the big, scary rust holes that used to be there, because as you can see, the built-in covers the area completely. (No one but me, that is – I had some inspection panels cut into the back of the bench, so every once in a while, I can poke my camera-on-a-stick back in there and make SURE the rust is gone for good.)
I guess the moral to the story is never, ever let an area that seems like rust might be starting go very long without a thorough inspection. We actually have one other area I’m a little scared about now, but with this one under my belt, I think I’m ready to get out my chipping hammer and see what it looks like!
You’ve got at least one reader who enjoys the mechanical side. I read/learned some more about the foam and fireproofing with intumescent paint.
What an adventure this is going to be. Looking forward to living vicariously…..
Intumescent paint? You just made that up!
My dad owned a hardware store and his dad and grandfather before him, so I’m a nuts n bolts guy. Over the years I, like you, have figured out that it is much easier to fix problems like your’s myself, than pay someone to do it wrong. I have every tool a hardware store has, had or would have had to do your project except the welding. Unfortunately, if I had your boat, I’d have to have one whole berth just for tools, nut, bolts paint ‘n’ stuff to fix whatever needed fixing. You would have spent ten times the money and especially time, if you’d turned you project over to “professionals.’ That being said, being 6″6′ and 275 I’d never have fit up under your work area(and I don’t do yoga), so I would never have bought such a ‘small’ boat that I couldn’t have fit into every nook and cranny. Before you leave the states, make sure you have all the tools, ‘nuts & bolts’ and stuff, cuz there ain’t no Ace Hardwares in the islands. JJ’s right, there is intumescent paint, though it wouldn’t have helped you. I have one ? you didn’t cover, up underneath did you re-foam, repaint, or what where you took off the foam?
Bob,
I haven’t finished the underside yet. Now that water can’t get down there, and it’s nice and dry, I know it’s not getting any worse. Also, because I had to wide an access hole down there to get to the foam (I left that part out of the already-too-long story), I can see in there very well. I will keep an eye on it, to make sure it’s not getting even a drop of water from above, and the next time I do some rust repair, and have the epoxy sealer and coating mixed up, I’ll coat that area. I’m up in the air on foaming it afterwards – since I’ll have the area completely sealed, and will be looking at it regularly, I’ll probably forego the foam.
Glad you got it fixed… great read! I was wondering how that went after seeing the beginning of the problem once the shroud was gone…
That’s right – you were there the day I found the problem! Didn’t look all that bad at the time, did it?
More than one nuts and bolts reader!! Love the details, pix, etc. I hope you will continue with similar writing. Especially details on the trip. Funny you mention a fire is a bad, bad thing on a boat. Guess who had a fuel leak fire on his boat just yesterday? Ahhhh, Roger that. My son started our outboard, of course does not have a blower motor to clear fuel vapors from that area. Fuel and vapor ignites, did you know that???? Blew the cowling off the motor, fire ensued, he put it out with our fire extinguisher, boat on trailer. To repair shop, fixed and back in the water today, he is fishing it!!! Yes, FIRE IS A VERY BAD BAD THING ON A BOAT. Great work Brian, careful, and cautious!
Great work, SHANE, for thinking quickly and getting your fire out!
Very interesting. I learned things that I didn’t know I needed to learn!
Great read for those of us gearheads out here, Brian. Makes me think of auto (or tractor, in my case) restoration work where a rust convertor can be used to turn the rust to something inert like iron phosphate and a top coat can be applied. Of course, you had holes. Rust convertors just will not repair holes, no matter how many times it’s applied. You did the right thing, and did a great job of it. But for less catastrophic damage, something like POR15 or Eastwood’s might do the trick. I like Ospho, although it’s hard to find in my neighborhood. Don’t know if salt water would pose a problem, but I’ve used it places that routinely get wet and, even without a top coat, it has prevented rust from returning. Just a thought.
CB,
Ospho is something I need onboard – great for when a little rust area first appears. Hit it with Ospho, put a little dab of paint on it, and it’s good for a long time – until the next “real” rust repair session. I used to use POR15 (Paint Over Rust) in auto restoration – painted the whole subframe of my ’69 Camaro with it, after an acid dip. Stayed beautiful the whole time I owned the car. I didn’t think of it for the boat – might be worth getting some. Thanks for the suggestion!
Love the update. Enjoyed the story. It is just another relevant part to the whole “Big Adventure”
firejeeps,
I don’t recognize your username or email – are you someone Fran or I know? If not, that’s cool – the site is open to everyone. And if you just want to remain anonymous, that’s cool, too. I’m just curious.
Butch